
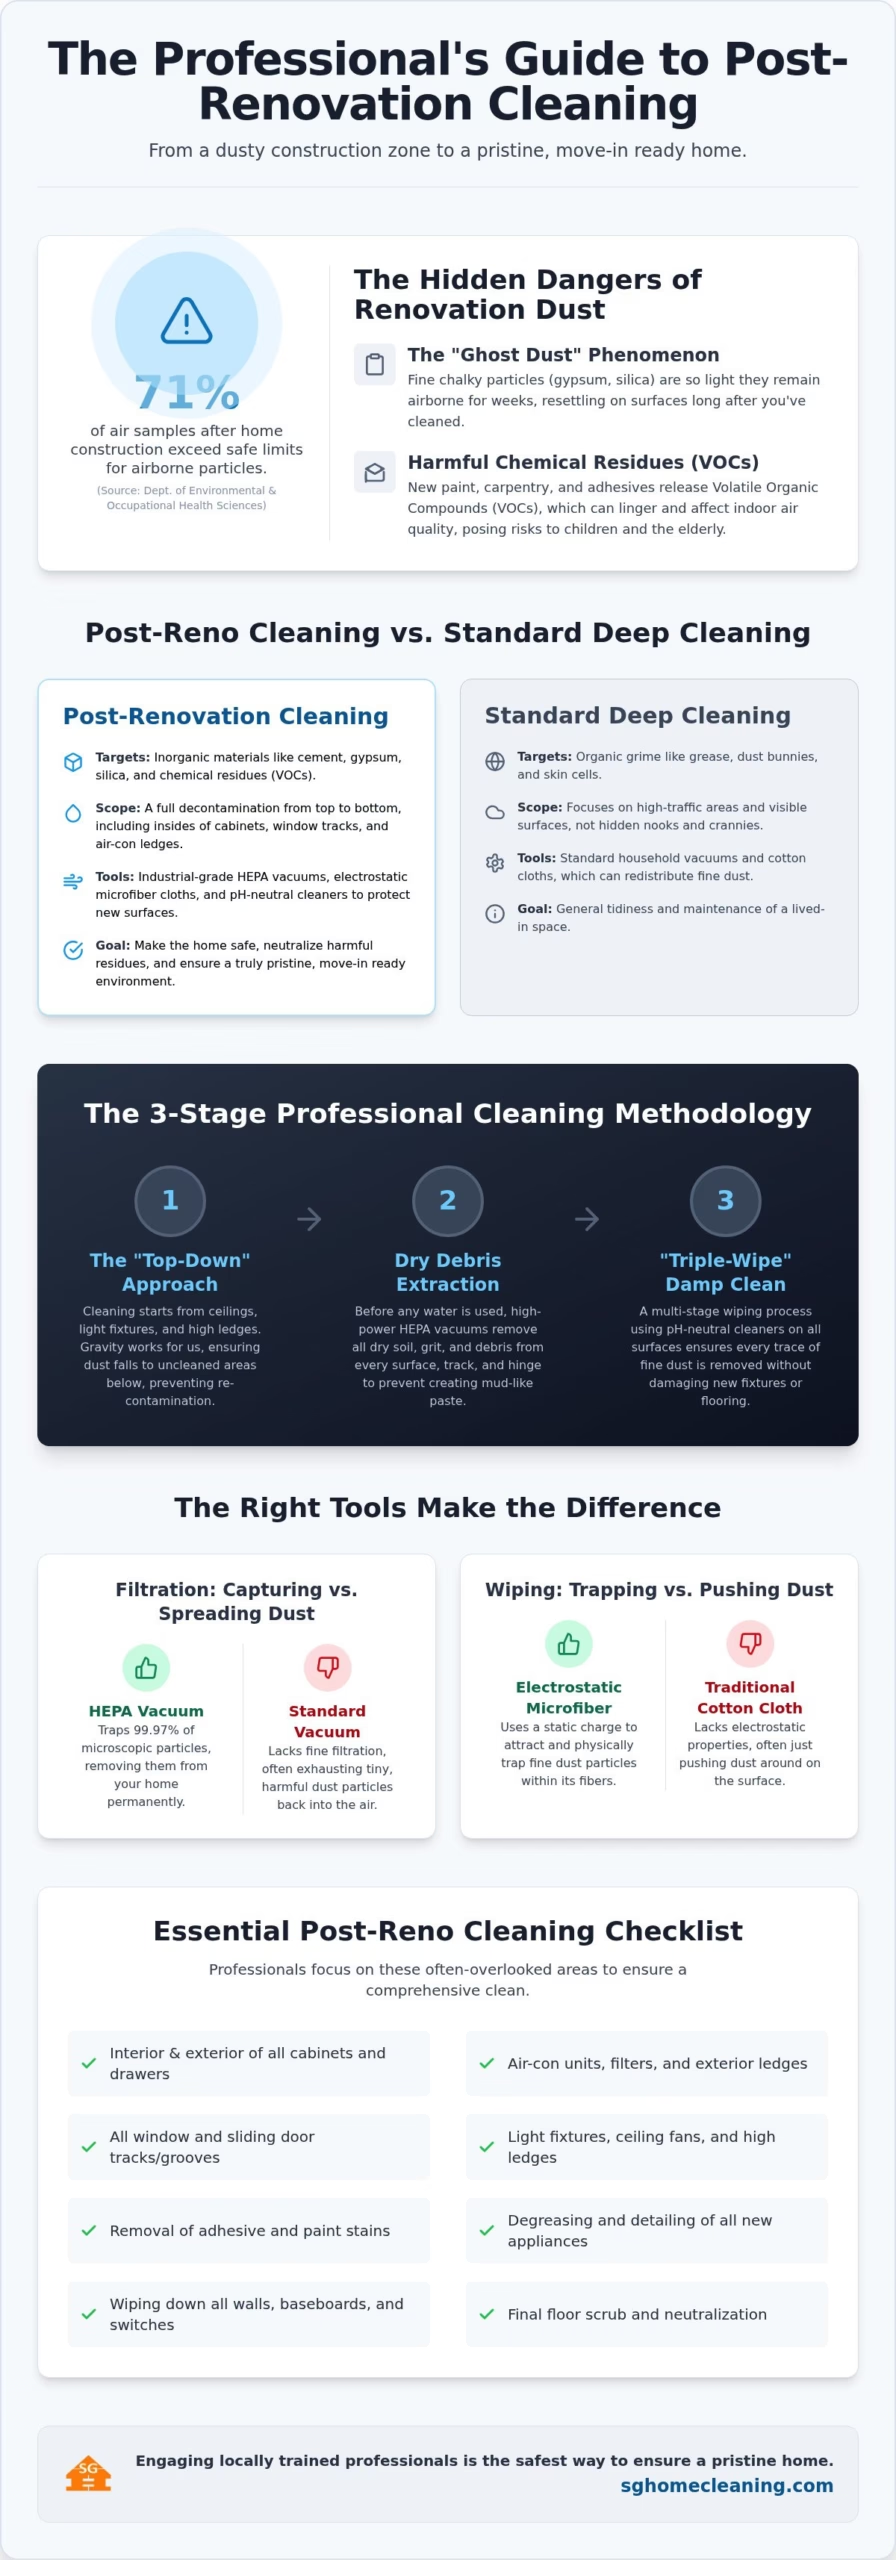
According to 2026 research from the Department of Environmental and Occupational Health Sciences, 71% of air samples collected after standard home construction exceeded safe limits for airborne particles. You’ve likely noticed that fine, chalky residue that seems to reappear on your shelves just hours after a thorough wipe down. It’s exhausting to battle persistent chemical odors from new carpentry while worrying that a standard scrub might permanently scratch your expensive new floor tiles. We understand that the final stretch of a home transformation is often the most stressful part of the journey.
Achieving a successful clean renovation requires more than just a mop and bucket; it demands a systematic decontamination process to make your home safe for children and the elderly. This guide provides a professional roadmap to eliminating construction dust and neutralizing volatile organic compounds effectively. You will learn the exact sequence of industrial-grade cleaning steps and specialized filtration techniques needed to protect your fixtures and ensure a pristine, move-in ready environment.
Key Takeaways
- Understand the “Ghost Dust” phenomenon and why standard wiping isn’t enough to stop fine particles from resettling weeks after your project ends.
- Learn the professional “Top-Down” methodology used in a clean renovation to ensure that dust from ceilings and light fixtures doesn’t contaminate freshly cleaned floors.
- Discover the advantage of using electrostatic microfiber and industrial HEPA-filtered vacuums over traditional cotton cloths to trap microscopic cement and gypsum particles.
- Access a comprehensive post-reno checklist covering often-overlooked areas like air-con ledges, cabinet interiors, and appliance degreasing.
- Identify why engaging locally trained professionals with specialized equipment is the safest way to remove adhesives and chemical residues without scratching new surfaces.
Why a Clean Renovation Requires More Than Standard Housekeeping
Post-renovation cleaning is the systematic removal of construction debris, fine dust, and chemical residues left behind after a build. It’s a far more intensive process than your typical weekend tidy-up. Many homeowners in Singapore are surprised to find a thin layer of white powder on their dining table just days after they thought they’d finished cleaning. This is the “Ghost Dust” phenomenon. These microscopic particles are so light they remain suspended in the air for weeks, slowly settling on every surface if they aren’t captured correctly at the source.
Understanding The Science of Dust reveals why these particulates are so difficult to manage. Construction dust often contains gypsum, cement, and silica, which behave differently than organic household dust. Safety is a primary concern here. Sharp debris, wood shavings, and industrial particulates often hide in window tracks and floor gaps, posing a risk to bare feet. Standard household vacuums usually fail in this environment. They lack the specialized filtration needed to trap fine silica, often exhausted back into your living space, which can aggravate respiratory issues.
The Difference Between Deep Cleaning and Post-Reno Cleaning
While a standard deep clean focuses on removing organic grime like grease and skin cells, a post-renovation cleaning targets inorganic construction materials. The scope is significantly broader. It requires cleaning the interiors of every built-in cabinet, the tops of ceiling fans, and the deepest corners of sliding door tracks where dust migrates. We use industrial-grade HEPA vacuums and advanced microfiber technology to ensure these particles are actually removed from the home rather than simply redistributed.
Addressing Chemical Residues and VOCs
New carpentry and fresh coats of paint often release Volatile Organic Compounds (VOCs) through a process called off-gassing. This is that “new house smell” which can actually be quite harmful. These chemical residues linger on the surfaces of your new wardrobes and kitchen cabinets. For households with newborns, the elderly, or asthma sufferers, ensuring high indoor air quality is vital. A thorough clean renovation involves meticulous surface wiping to neutralize these residues and facilitate better air circulation, making your home truly safe for move-in.
The Science of Effective Construction Dust Removal
Effective dust removal isn’t just a matter of effort; it’s a matter of physics. We utilize a strict “Top-Down” methodology to ensure gravity works in our favor. By starting with ceiling fans, light fixtures, and high ledges, we ensure that falling particles are captured in subsequent stages rather than contaminating already-cleaned floors. This systematic approach is essential for a truly clean renovation.
The choice of materials is equally critical. Unlike traditional cotton cloths that often push dust around, microfiber cloths provide an electrostatic advantage. They physically trap microscopic gypsum and cement particles within their fibers. To protect your family from the health risks of construction dust, we employ high-filtration HEPA vacuums. These units prevent the recirculation of fine silica back into the air. Achieving a professional clean renovation also requires neutralizing alkaline residues from cement and grout, which can permanently dull the finish of new floor tiles if left untreated.
Stage 1: Dry Soil and Debris Extraction
Before any moisture is introduced, we perform a thorough dry extraction. This involves using high-powered vacuums to remove bulk debris from window tracks, sliding door grooves, and cabinet hinges where grit often accumulates. Dry extraction is the critical first step to prevent mud-smearing, as adding water to fine construction dust creates a thick paste that is much harder to remove. We focus on every hinge and runner to ensure no abrasive particles remain to damage your new fixtures.
Stage 2: The Multi-Wipe Damp Cleaning Process
A single wipe is never enough for post-reno environments. We use a “triple-wipe” technique to ensure every trace of fine dust is gone. We use pH-neutral cleaners specifically chosen to protect your new quartz countertops and vinyl flooring from chemical damage. This stage includes meticulous attention to internal surfaces like drawer runners and electrical outlets. If you’re feeling overwhelmed by the technical requirements of this process, you can speak with our specialists about a professional handover clean.
Your Essential Post-Reno Cleaning Checklist
Moving into a newly renovated home should be a moment of celebration, but the presence of construction residue often dampens the excitement. A successful clean renovation requires a systematic approach across every room. Unlike daily maintenance, this checklist focuses on the specific residues left by contractors, ensuring every corner meets move-in standards. We recommend following this order to prevent cross-contamination between zones.
- Living Areas: Dust settles on ceiling fans and light fixtures first. Ensure air-con ledges and all wall surfaces are wiped to remove fine gypsum that often clings to vertical planes.
- Kitchen: Clean the interior and exterior of every cabinet. Degrease new appliances to remove factory oils and polish backsplashes until they are streak-free.
- Bathrooms: Focus on removing grout haze from tiles using specialized solutions. Sanitize new toilets and sinks while polishing mirrors and chrome fixtures.
- Windows: Deep-clean glass panes and frames. Pay special attention to the tracks where grit and metal shavings from aluminum works tend to accumulate.
Protecting New Surfaces During the Clean
It’s heartbreaking to find scratches on a brand-new quartz countertop or sensitive laminate surface. You must avoid using abrasive green pads or steel wool on these materials. For common Singaporean flooring like vinyl and parquet, use soft microfiber and pH-neutral solutions to prevent warping or stripping the finish. Homogeneous tiles can handle slightly more pressure, but you still need care when removing paint splatters or silicone residue. We recommend using a plastic scraper rather than metal to prevent permanent gouging of your new surfaces.
Final Handover Checks
Before declaring the job finished, perform a “white glove” inspection in hidden areas. Check the tops of door frames and the spaces behind appliances where dust often hides. Ensure all chemical smells from new carpentry are dissipated through surface neutralization. This step is vital for the health of your family. For a comprehensive breakdown of what a professional team handles, you can review our full post-renovation cleaning service page.
Why Professional Help is the Best Way to Clean After Renovation
Executing a comprehensive checklist alone is a massive undertaking that often leads to exhaustion before you’ve even moved in. A professional clean renovation team brings a level of efficiency that a DIY approach simply can’t match. What might take an individual several days of grueling labor can be completed by a trained crew in a single morning. This speed doesn’t come at the cost of quality; it’s the result of systematic coordination and specialized training designed for high-intensity environments.
Beyond time savings, professionals utilize industrial-grade equipment that isn’t typically found in a standard broom cupboard. Access to high-filtration HEPA vacuums ensures that microscopic dust is removed from the premises rather than simply recirculated into the air. Specialized scrapers and pH-neutral solvents allow for the safe removal of stubborn adhesives and paint splatters without risking the integrity of your new surfaces. Engaging experts also offers essential peace of mind. You’ve likely invested a significant amount into your home transformation. Professional cleaners protect that investment by using the correct techniques for every specific material, while also safeguarding your health by minimizing your personal exposure to harmful construction particulates.
The Value of Locally Trained Cleaners
Locally trained cleaners understand the specific architectural nuances of Singaporean homes. They’re familiar with the typical layout of a 4-room HDB flat and the high-end finishes found in luxury condos. This local expertise ensures reliability and clear communication regarding the cleaning scope. You won’t have to worry about whether the team understands the importance of cleaning air-con ledges or the specifics of homogeneous tile care. To ensure your renovation budget remains on track, you can consult our post renovation cleaning price guide for a clear understanding of professional costs in the current market.
Booking Your Post-Reno Clean
Timing is everything when scheduling your service. The “sweet spot” is typically a day or two after your contractors have officially handed over the keys but before your furniture delivery arrives. This window allows the team to reach every corner of the floor and the interior of every cabinet without obstruction. We provide transparent, fixed-price quotes based on your specific property type, whether it’s an HDB, Condo, or Landed home. This clarity prevents any surprises on the day of the service, allowing you to focus on the joy of your new home.
Transitioning from Construction Site to Sanctuary
Completing a home transformation is a significant milestone, but the final barrier to true comfort is the persistent residue left behind by the build. We’ve explored how a successful clean renovation depends on a systematic, top-down approach and the use of specialized HEPA-filtration equipment to capture microscopic particulates that standard vacuums miss. From neutralizing chemical off-gassing to meticulously extracting grit from window tracks, every technical step ensures your environment is safe for children and the elderly.
Our locally trained and vetted teams understand the specific requirements of Singaporean homes, providing a comprehensive 100% dust-removal scope that protects your expensive new fixtures. You don’t have to face the daunting task of post-reno cleaning alone. Professional expertise allows you to skip the physical strain and move directly into a pristine, healthy living space without the fear of scratching new surfaces.
Your new home is finally ready to be enjoyed. Let us help you reveal its full potential so you can focus on making memories in a truly clean environment.
Frequently Asked Questions
How soon after my renovation should I book a cleaning service?
Ideally, schedule the service 24 to 48 hours after all construction work and defect rectification are complete. This gap allows fine airborne particles to settle so they can be captured effectively. You should ensure contractors have fully vacated and removed their heavy equipment. Booking during this “sweet spot” ensures your clean renovation isn’t compromised by workers returning to touch up paint or grout, which creates new dust.
Can I stay in the house while the post-renovation cleaning is being done?
You can remain in the home, but we generally recommend being elsewhere during the most intensive hours of the session. The process involves high-powered HEPA vacuums and specialized chemicals that can be noisy or have temporary odors. If you have young children or respiratory sensitivities, staying out of the property ensures you aren’t exposed to the particulates being agitated during the extraction phase. Most owners return for the final inspection.
What is the difference between move-in cleaning and post-renovation cleaning?
Post-renovation cleaning is a specialized decontamination process targeting inorganic construction materials like cement, sawdust, and adhesive residues. In contrast, move-in cleaning focuses on removing organic grime and general dust from a previously lived-in or vacant property. While both involve deep cleaning, a post-reno session requires industrial equipment and a “top-down” approach to handle the massive volume of fine particulates that migrate into cabinet hinges and window tracks during a build.
Do I need to provide the cleaning supplies and equipment for a post-reno clean?
No, you don’t need to provide any materials for this specialized service. Our team arrives fully equipped with industrial-grade HEPA vacuums, microfiber technology, and pH-neutral solutions tailored for sensitive surfaces like quartz and vinyl. Using our own high-filtration equipment is vital because standard household vacuums often fail to trap fine silica dust. This ensures a thorough clean renovation without the risk of you providing inadequate tools that could damage your new fixtures.
How long does a professional post-renovation cleaning session typically take?
A standard session usually takes between 4 to 8 hours, depending on your property size and the intensity of the renovation. For a typical 4-room HDB flat or a 3-bedroom condo, a team of locally trained professionals can complete the work in approximately half a day. Larger landed properties or homes with extensive built-in carpentry may require a full day to ensure every drawer runner and ceiling fan is meticulously wiped.
What happens if I find dust settling again after the cleaning is finished?
It’s normal for a microscopic amount of “ghost dust” to settle within 24 hours as the air completely clears. However, our systematic multi-wipe process is designed to minimize this phenomenon significantly. If you notice a substantial layer of residue shortly after our team leaves, you should contact us immediately. We prioritize a stress-free handover and will address any areas within our project scope that didn’t meet the rigorous standards of a professional clean.